At Nintex we understand customers who are currently using Nintex for Office 365 want to utilize our next-generation process automation platform and start moving workflows to Nintex Workflow Cloud. And we also know how important it is to make that transition process as easy and simple as possible.
Nintex will be providing an easy path that allows workflows in Nintex for Office 365 to be quickly upgraded to a Nintex Workflow Cloud platform – whenever you’re ready.
Nintex Workflow Upgrade Tool for Office 365
We’re thrilled to introduce the Nintex Workflow for Office 365 Upgrade Tool. This embedded upgrade tool will help you to upgrade your workflows in Nintex for Office 365 to Nintex Workflow Cloud.
Throughout the upgrade journey, there will be a guided experience within the products to easily navigate you through each step of the way to ensure the workflow is moved across successfully. As part of this upgrade journey, there are 5 key steps involved – let’s run through each step and how the upgrade tool plays its role.
The five steps of a workflow upgrade journey
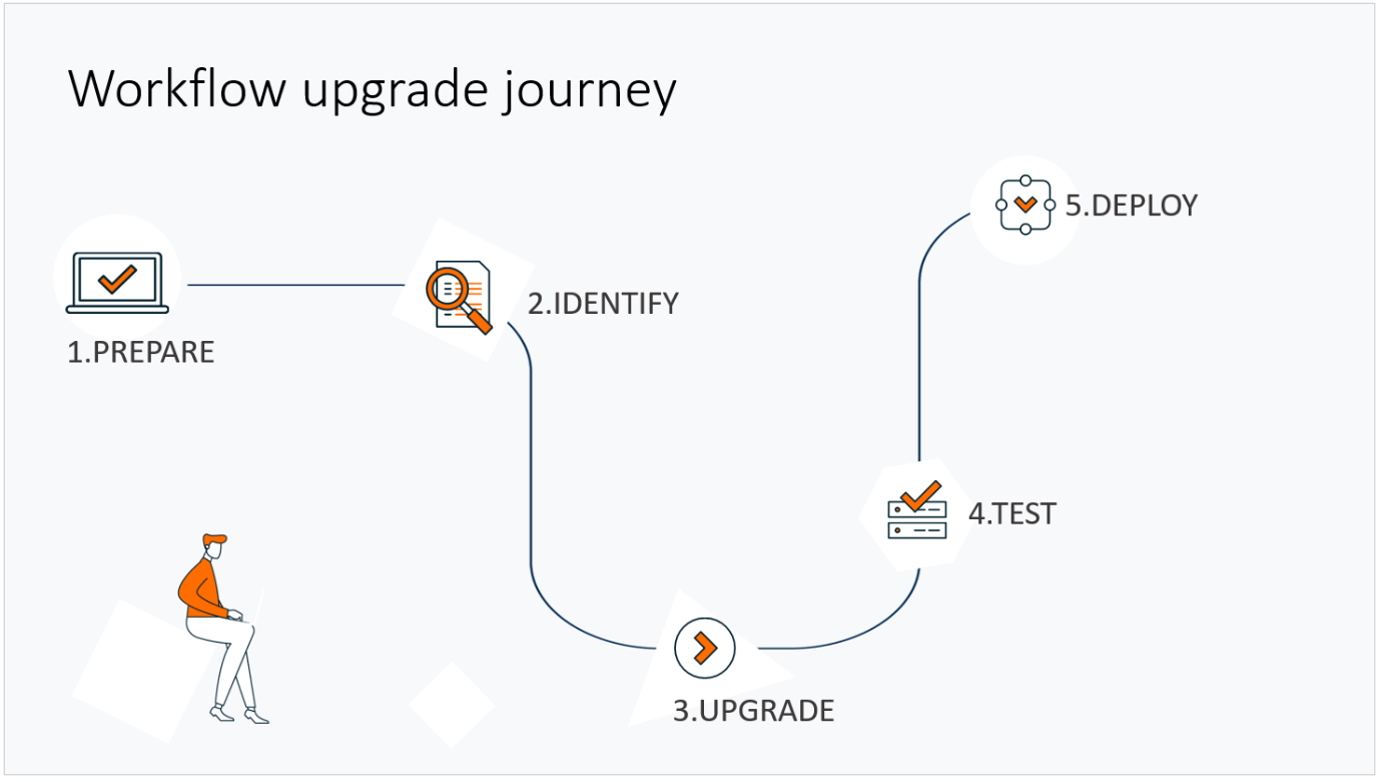
1. Always start with preparation
The first step is preparation, and this is all about understanding the destination you are moving your workflows to. This includes understanding the capabilities Nintex Workflow Cloud has to offer, and how the experience may be different from Nintex for Office 365. A good place to start is to sign up for a trial (if you don’t have a Nintex Workflow Cloud environment already) and familiarize yourself with the interface. Detailed help documentation will continue to be available, as well as Nintex Workflow Cloud training programs within Nintex University.
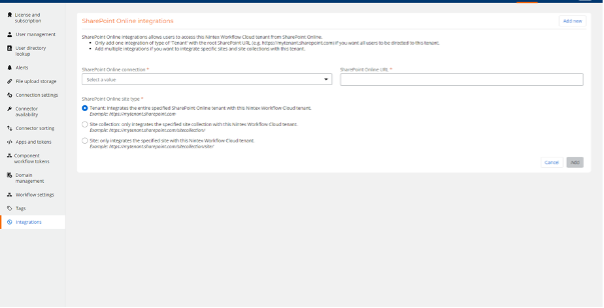
Note that a Nintex Workflow Cloud tenant will need to be set up and prepared prior to upgrading your workflows. This includes configuring user management, connections, and global workflow settings so they are consistent with your existing environment in Nintex for Office 365. Then it’s time to establish a connection to your Office 365 environment. There will be a new Integration capability available in Nintex Workflow Cloud which allows you to integrate with your Office 365 environment at any level including tenant, site collection, or site level, allowing more flexibility depending on your upgrade rollout approach.
2. Identify the workflows you want to upgrade
After the preparation, the next step is identifying which workflows to upgrade to Nintex Workflow Cloud. To help with this step, the new upgrade tool will provide an ‘Upgrade availability’ list in the workflow gallery which will indicate if a workflow is ready to be moved over. The status can be either ‘Ready’ which means the workflow can be moved over fully or ‘Review required’ which indicates the workflow needs to be reviewed as it may contain actions or task form controls/functions that may not be currently available in Nintex Workflow Cloud.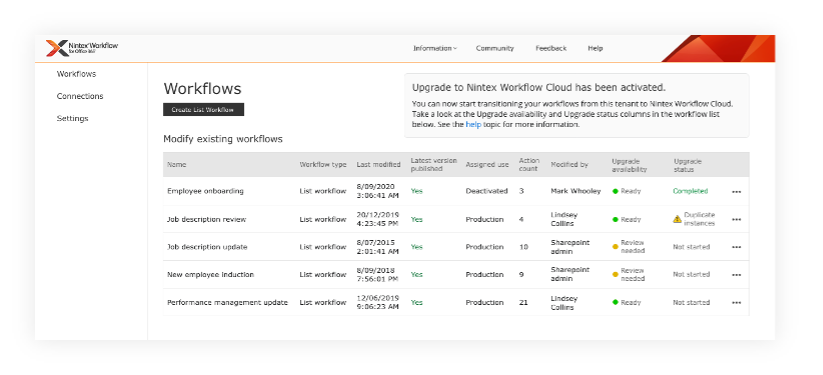
Get more information about workflows with a ‘Review required’ status with the ‘Upgrade details’ capability which will detail what the workflow contains that is not currently available in Nintex Workflow Cloud. The ‘Upgrade details’ will enable a far quicker path to plan the remediation steps ahead of upgrading – while making this identification step much easier as it reduces the need to cross-reference with Nintex Workflow Cloud.
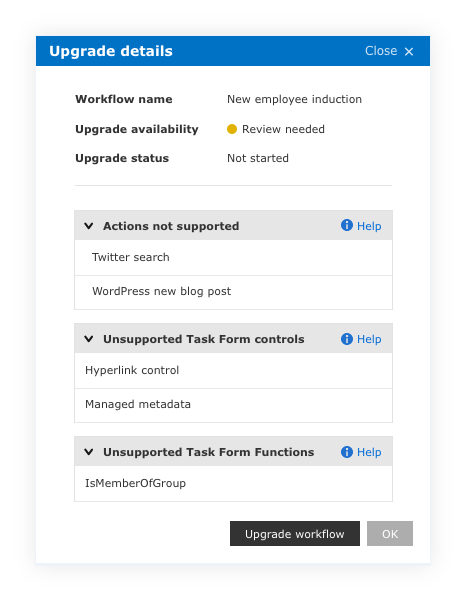
Currently, most actions in Nintex for Office 365 will be available in Nintex Workflow Cloud—however—there may be certain Live actions that are not available. This may be remediated by leveraging Nintex Xtensions® framework – where custom connector actions can be created to enable the integration to and from third-party platforms in your workflows.
3. Start upgrading with the upgrade tool
Once it has been identified which workflows to start upgrading, the next step is to start the upgrade process by clicking on the ‘Upgrade workflow’ button. This can be done from the gallery or in the workflow designer.
Once the upgrade has started, the workflow conversion will be processed and then sent to Nintex Workflow Cloud. The magic that happens behind the scenes is powered by our in-house developed Process Upgrade Engine. This engine will be capable of mapping all actions across and if an action does not exist, it will be mapped to a placeholder action to ensure the overall workflow design shape is retained. The engine is also smart enough to know that certain actions in Nintex for Office 365 may need to be mapped to several actions to replicate the same outcome – this is known as the compound solution.
Workflow variables, task form controls, and functions as well as workflow configurations and SharePoint context may also be mapped across.
After the upgrade process has started, the ‘Upgrade status’ on the workflow gallery page will update to ‘In Progress’, and this will allow easy tracking of the upgrade status across multiple workflows.
4. Remediate and test the workflows
The next step is to start remediating and testing the workflow(s). A message with “Workflow upgrade details” will display on the right-hand side next time the workflow designer is opened. This provides an at-a-glance view of how the workflow migrated. The workflow upgrade details log will also contain valuable information that you need to know such as actions that have become a compound solution, or perhaps an action behaves slightly differently during runtime. This will simplify the remediation step even further as this level of information will be available from a glance to help guide you in quickly identifying what actions needs further attention.
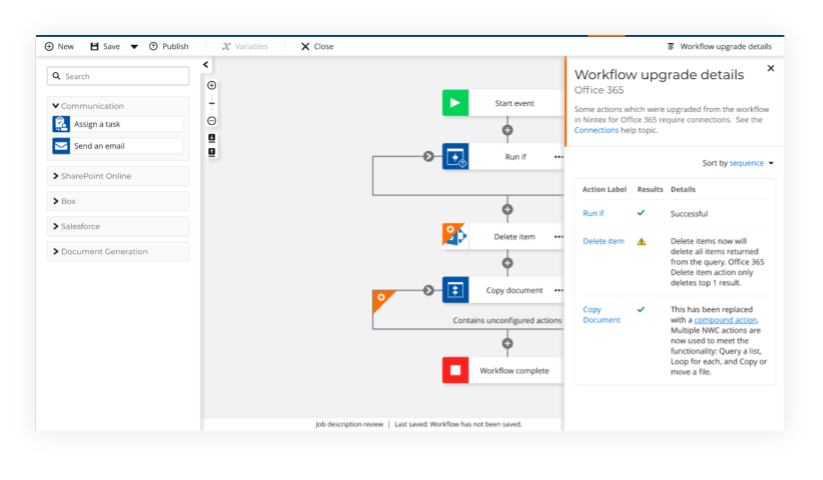
Note: Nintex workflows within Office 365 are not impacted during the upgrade
As you test your newly upgraded workflow, the great thing about this upgrade tool is that you can continue to test and refine without impacting the existing workflow solution in Nintex for Office 365. Those workflows will continue working away in production until they are turned off.
5. Time to go-live
Once testing is complete and the upgraded workflow is ready to go-live, the next step is to turn on the workflow in Nintex Workflow Cloud and retire the duplicate workflow in Nintex for Office 365. These steps must happen at the exact same time to avoid any potential duplicated workflows running across both platforms. To do this switch, there will be the capability to deactivate the Nintex for Office 365 workflow as you are publishing the workflow in Nintex Workflow Cloud.
No in-flight running processes will be disrupted
One thing to note is when the workflow is deactivated in Nintex for Office 365, this will not impact any of the in-flight and existing running workflow instances. Those will continue to run and complete as normal.
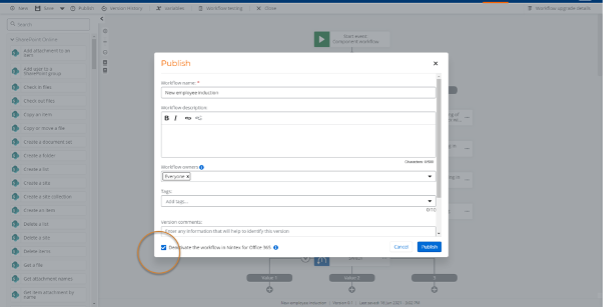
After the successful switch, the ‘Upgrade status’ will be set to ‘Complete’ in the Nintex for Office 365 workflow gallery.
What if I need to roll back?
Having a plan B is always important when it comes to production deployment. In the event you may need to roll back and the Nintex for Office 365 workflow needs to be turned back on, this will be available with the ‘Reactivate’ workflow feature available from Nintex for Office 365 which will turn the workflow back on. The workflow in Nintex Workflow Cloud can then be paused and resumed once the incident is remediated.
Nintex will support you on your upgrade journey
In addition to the upgrade tool, Nintex will provide further support to ensure a successful move to Nintex Workflow Cloud such as: access to detailed help documentation, Nintex University upgrade tool training videos, and Upgrade Centre services with multiple plans available to fit your company needs (coming soon).
For more information on how to get started, please contact your Nintex representative.
Want to learn more about how your organization can implement this tool? Request a demo today!
